Keeping up with thousands of 3D printable miniatures and terrain pieces can be a nightmare. Looking for a specific skeleton from your collection can feel an awful lot like looking for an undead needle in a haystack. Fortunately, we heard your cries of agony, and are here to help. MiniHoarder’s storage and organizational system can help keep your minis organized and, more importantly, searchable. Today we’re going to hone in on one particular feature: tags.
Expand Your Hoard
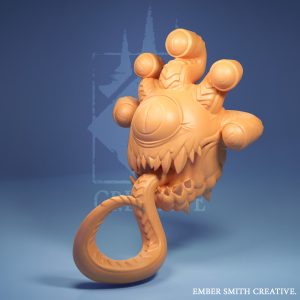
Looking for that perfect 3D printable miniature or terrain piece to add to your collection? Our marketplace has an incredible selection of 3D printable models that will be perfect for your game table.
Tags are probably a familiar concept for many folks, but just to keep everyone on the same page, let’s take a minute to discuss what they are and how they can be helpful. A tag is a word or phrase that is used to both describe and group files together. On MiniHoarder, tags can be assigned to individual files, or to several files at the same time. Additionally, you can assign tags to files as you upload them to our cloud storage service. More on the details later.
Tags can be used to group your 3D printable files in just about any way you can image.
Want to mark certain models as being part of a campaign for your tabletop adventures, or even a specific encounter? Add a descriptive tag to lump them all together. Want to be able to quickly find every goblin from all of the 50 artists you back on Patreon? Slap a goblin tag on there, and you can find them all with the click of a button. It’s also useful to group several files that are part of the same model. While sticking them in the same folder is also a great way to go, being able to pull them all up on a moment’s notice is a pretty great feeling.
Combined with our advanced search capabilities (more on this in an upcoming article), your ability to both group sets and subsets of models together, as well as the ability to pull them up quickly, helps to ensure that you’ll never loose, or get lost in, your 3d printable hoard again.
Using tags to find files is all well and good, but if it’s a pain to add them, then what’s the point? We’ve added several ways to add tags to your files, and continue to refine the process to make it as easy as possible. As we mentioned above, there’s currently three ways that you can add tags to files. One important note that we should mention is that tags are not case sensitive. This means that if you add the tag “goblin”, “Goblin”, and “GobLIN”, it will all register as the same tag. We did this both to minimize the chance that folks accidentally create separate tags when they intended for files to be grouped together, and also to more efficiently track tags on our end.
During File Upload
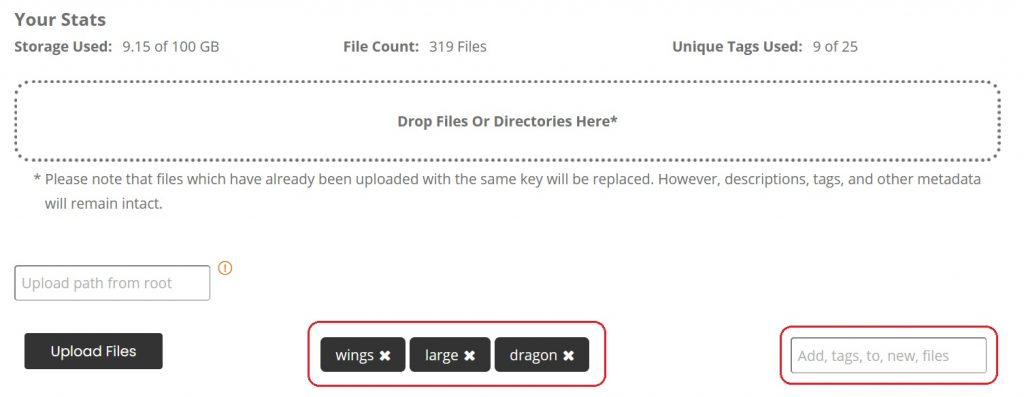
The first chance you’ll get to add tags to your 3D printable files is during the upload process itself. If you happen to be bulk loading a bunch of files that you’d like to be grouped together, but that don’t necessarily fit into the same folder, then this is the way to go. To do this, just type your tags into the text field with the text “Add, tags, to, new, files”.
To add multiple tags to the files, separate them in the text field with a comma or by using the enter key. You’ll see them added as a button next to the input field with a big “X” next to the tag name. To remove the tags listed, just give that “X” a friendly tap, and it should disappear. Any tags that are entered will apply to all of the files that are being uploaded.
Tags Can be Added While Uploading Files
Add to Files In Bulk
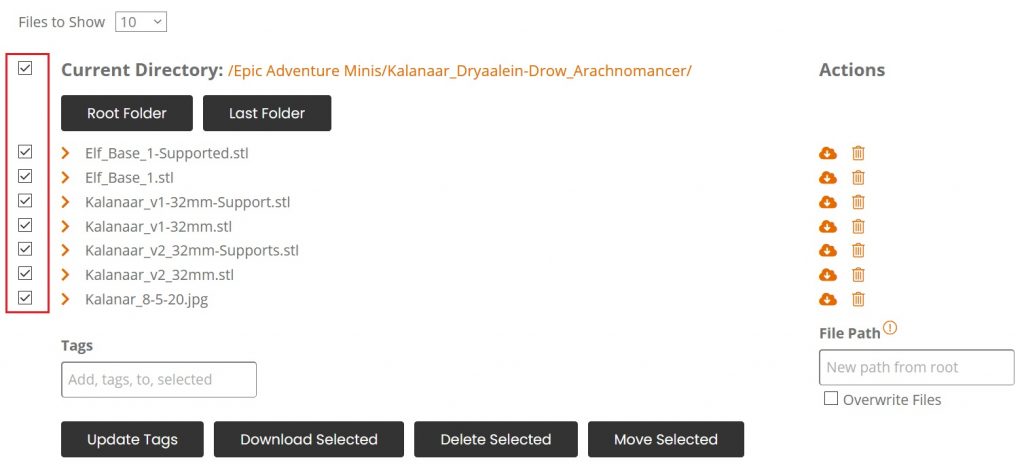
Add Tags to Several Files at Once
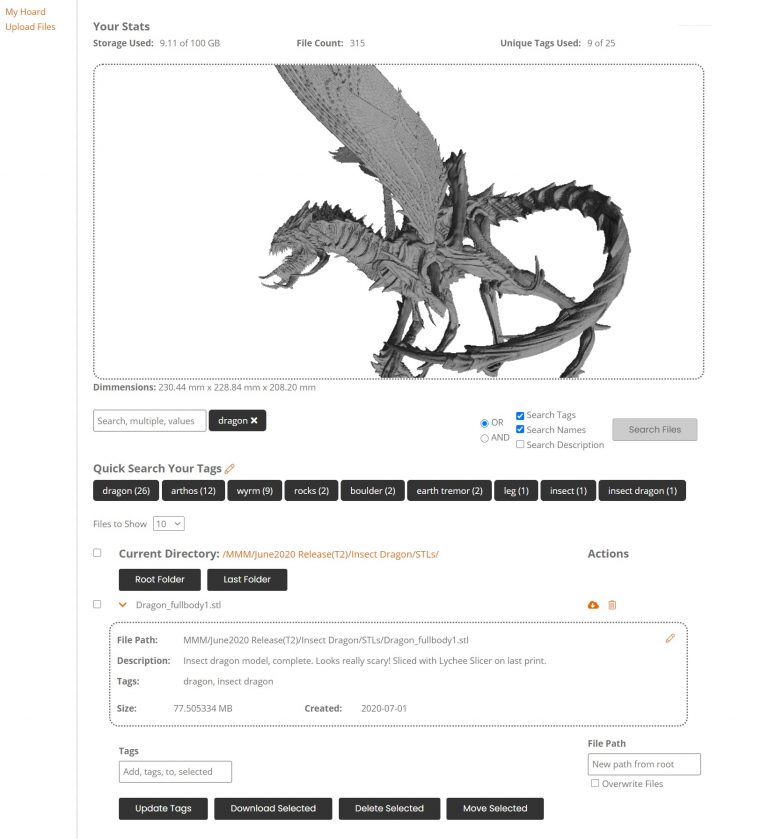
If you want to add tags to files that have already been uploaded, you’re in luck. The fastest way to do this is to navigate to the folder that includes the files you want to tag and check the box next to each file you want to add the tag to (or check the box next to the title, “Current Directory” to add everything in the folder).
Once you’ve selected all the files, enter the tags you want to add to the selected models in the text field labeled “Tags”. You can add multiple tags by separating them with commas or by hitting return. To remove any tags you’ve entered accidentally (or realized you misspelled, like me), just hit the “X” on the tag button that’s created as they are entered.
Finally, when you’re satisfied with both the tags and the selected files, hit the button labeled, “Update Tags”. Voila! You’ll also notice that the tags listed under the quick search area automatically update with your new entries.
Add to Individual Files
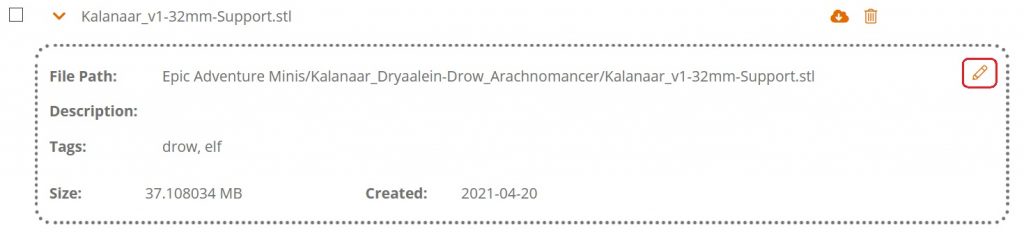
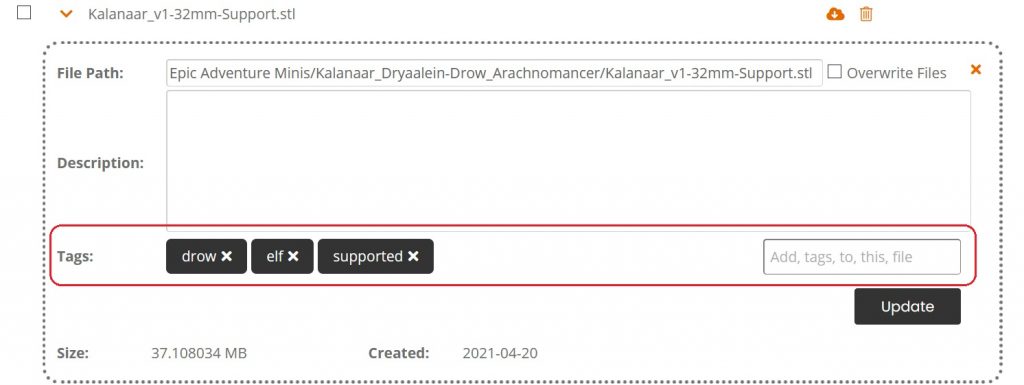
If you’re looking to make several changes to a single file, it’s possible to add (and remove) tags from them individually. To do so, navigate to the file that you want to modify, and then hit the down arrow next to the file name. This will expand an area to show any additional details you’ve entered about the file, the full file path, the file size, when it was originally uploaded, and of course, any tags that are already associated with it.
Click the Pencil Icon to Edit File Details
To modify these tags, click on the pencil icon in the top right corner of the file details panel. This will change the editable fields to become inputs. Adding tags here is much like adding them from the other available methods. Type new tags into the field on the right with the placeholder text, “Add, tags, to, this, file”. New tags should be separated by commas or by hitting the return key. To remove a tag, hit the “X” listed to the existing tag, and it will be removed from the list.
When you’re done editing the tags and happy with how they are, hit the button labeled, “Update” on the bottom right of the file’s details pane.
Add or Remove Tags to an Individual File
Using Tags to Find Your 3D Printable Files
Now that your file have all the tags, it’s actually time to put them to use. MiniHoarder currently offers two ways to search for files based on tags. Let’s take a look.
Quick Tags
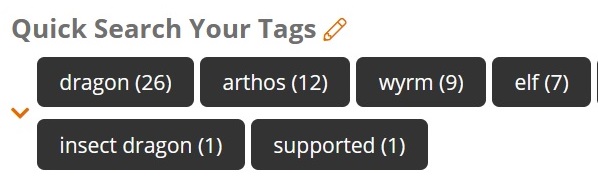
The first is to simply click on the tag listed under the heading, “Quick Search Your Tags”. Clicking on this will, surprise surprise, quick search your files using the tag that you clicked on. If you click on another quick tag button, a new search will be preformed and will replace the current search results with items containing the tag you just clicked.
Quick Search Your Tags by Clicking Them
The results will only show files with the selected tag, and not items with the tag in the name or description. For example, let’s say you have a file named BigDragonOfAwesomeness.stl. If doesn’t have the tag “dragon” (but you have several others that do), when you click on the “dragon” tag, this file will not show up. This provides with a quick an easy way to get access to a specific group of files without having to remember where they all live.
Search Bar
There are times you might want to combine a search to use multiple tags. The search bar above the quick tag section will let you do exactly that. When you start typing in the search bar above the quick tag list, you’ll notice that we conveniently suggest your tags as an autocomplete option. You can add as many tags as you’d like to search on by hitting enter or comma to separate them. Just like with the other tag text fields, these tags will be added to a list to the side of the search bar where you can remove them if you make any sort of mistake.
Your Tags Will be Suggested as You Search for Files
The search bar functionality is pretty extensive, and we will cover it in greater detail in a separate article, but there is two points that we need to make here. The first is that make sure the “Tags” radio button is selected if you want to search models tags with you entered values. This is pretty straight forward.
The second point is that MiniHoarder currently offers different Boolean operations for searching. Currently, it’s only “AND” and “OR”. Selecting “AND” will only show models that have all of the tags that are entered. For example, if you’re looking for skeletons with bows, and have tagged your models by type and equipment, then you can enter the tag “skeleton” and “bow”, make sure that “AND” is selected, and hit “Search Files”. This will return all models that have both of the tags, “skeleton” and “bow”.
Selecting “OR” will show any models that have either of the tags. Using our previous example, you would find any skeletons using any weapon, as well as any other models using a bow.
Editing Existing Tags
So you had a late night, busy… adventuring. Of course the first thing you do when you get back is to start adding tags to your expanding hoarding. In the morning, you realized you spelled “dragon” as “dragonzes”, and now have two separate tags that you’d like to combine into one that is properly spelled (or not, we don’t judge). MiniHoarder’s will let you remove, edit, or combine tags at your leisure. The power is yours to wield with reckless abandon.
Enter Tag Edit Mode by Clicking on the Pencil
To make changes to the tags themselves, click on the pencil icon next to the quick tag list next to the title, “Quick Search Your Tags”. This will place your tag list in edit mode, and will put a dotted border around all of your tags. To edit them, click on the offending tag, and the tag will change to an editable input with a couple of icons next to it.
Enter your new tag in the input field. To save it, click on the check icon. To cancel the edit and keep your original tag, click on the “X”. If you’d like to remove the tag and its references entirely, click on the trash can icon. Note that if you rename the tag to one that already exists, the two will merge. That’s it!
Edit or Delete an Existing Tag
The Grande Finale
With that, you’re well on your way to mastering your printable hoard. It can definitely be overwhelming, but don’t let your massive collection of 3D printable files get the better of you. With file tagging, your ability to organize and search the exact miniature or terrain piece you need is at hand. We’re constantly adding new features to our 3d printable file storage service and organizational tools. If you have a feature you’d like to see, let us know in the comments below, or send us an email directly to [email protected].
No idea what we’re talking about? Man, we’ve been there. If you’re a fan of 3D printing and have a massive amount of 3D printable files that have started to overwhelm you, checkout out our hoarding plans. We can keep your files safe and manageable, regardless how large your hoard has become.
Just Dipping Your Toes Into 3D Printing? It All Starts With the Files.
If you’re just hopping into the 3D printing scene, one of the first things you’ll need to do before you start cranking out stunning printable miniatures and epic terrain pieces is to… actually find the 3D printable files for those miniatures and terrain pieces in the first place.
Now, if you’re reading this article and in need of said printable models, I’d encourage you to hit the menu item labeled Marketplace up at the top of this window. There you will find thousands of choices to satisfy just about every gamer’s fancy. And this brings us to our second problem. Printing miniatures and terrain is a lot like opening a can of Pringles. Once you pop, you can’t stop.
But what to do with all of those files? Once you get going, it can feel like they multiply faster than rabbits. Unless you want to spend your nights looking for “Intimidating Orc #57”, planning ahead is key. Fortunately for us, our friends at Slice Print Roleplay recently made a video that addresses both the problems of where to find printable files, as well as what to do with them once you start to amass a small hoard.
Now you might be thinking to yourself, “What’s the big deal? I’ve been messing with files since I could reach a keyboard!” Now, that is probably true and you might be one of the few savants out there that can actually remember every file you’ve ever cut, copied, or pasted. If that’s true, this might not be for you.
However, keep in mind that once you get rolling, it’s not uncommon for individuals to end up collecting terabytes worth of files. While some models can get pretty heavy in the size department, I’m looking at you massive and incredibly detailed epic bosses, that is still thousands and thousands of files. Not to mention that you’ll likely have them coming in from different sources and by different artists over months, and possibly (hopefully!) years.
The organizational scheme outlined by Print Slice Roleplay in the video above is a great way to stay on top of your collection.
Level Up Your Organization with MiniHoarder
Now, if you see yourself with thousands of files wishing for a better way to track, organize, and store your 3d printable files, our cloud storage and organizational tools might be the ale to quench your dwarven thirst. Not only do we provide a cloud based storage solution to keep your files safe no matter what happens to your hard drive, we also provide a way to tag them, search them, view them in the browser, and add detailed notes, such as the artist or where you go the model.
Just in case you missed it, Slice Print Roleplay also shared a coupon code near the beginning of the video for a free month of the storage service. Give it a shot and let us know what you think!
Wrapping Up
Getting started with 3D printing miniatures and terrain is a fantastic hobby, but can also be a bit difficult to break into. Figuring out the best place to get your models, and then knowing what to do with them once you have them is all part of the fun. For more tips and information on getting started with 3D printing, we can’t recommend Slice Print Roleplay’s videos enough. We’ll certainly be doing more posts on them, but if you can’t wait (and we couldn’t blame you!), you can find more at their YouTube channel.
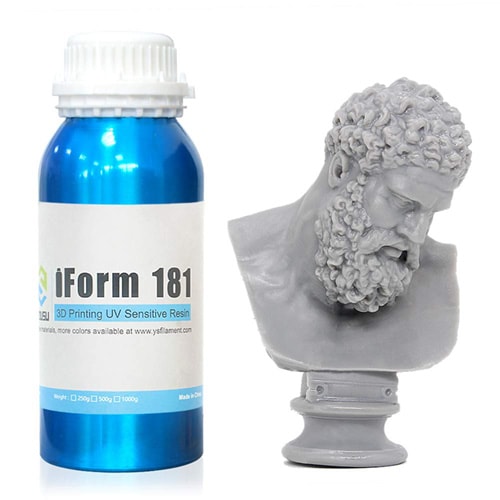
In the world of 3D printing, next to the actual 3D printer you use, few choices are as important as the resin. The resin you choose can make all the difference in a miniature that turns out fantastic and lasts for years, or one that looks like it ended up on the wrong end of an acid splash spell and breaks after it’s first time on the game table (not that you’d necessarily mind at that point). In this video, our friends at Slice Print Roleplay perform a very nice Yousu iForm 181 Resin review using a model from The Printing Goes Ever On, and their trusty Elegoo Mars 2 Pro.
Resin costs can really range the gamut, from around $20 a bottle to well over $100 a bottle for dental grade resin. Fortunately for us, we’re not putting these anywhere near our mouth (right?!), so we can stick to the more reasonably priced bottles. Even for the resins typically used for printable miniatures, the Yousu iForm 181 Resin is priced beautifully at $17 a bottle.
Durability and Flexibility
If you haven’t watched the video by this point, you really should. Slice Print Roleplay performs some flexibility and drop tests with nice results. There’s something both sad and fantastic about watching parts of a miniature snap in half. It’s okay to admit it. It’s the barbarian in all of us. Suffice it to say, you won’t be using the Youso iForm 181 Resin to 3D print an actual battle worthy warhammer, but it gets the job done.
More About Those Models
If you’re interested in the models that were used in the video, you can find The Printing Goes Ever On right here on MiniHoarder. If you’re looking for a long term commitment to the artist (which we always highly recommend), you can find their Patreon page here.
More To Come
What’s next? We’re very excited about our partnership with Slice Print Roleplay and the content that they bring to the gaming and hobbyist tables. You can expect to see more content of theirs featured on our site, along with additional articles and tutorials on all things modeling, printing, and gaming related. If you’d like to see anything specific, let us know at [email protected], or leave us a comment below!